Campus Device Management🔗
This section explains how to onboard and manage devices in a campus Everon™ Network Solutions system. Campus environments often have diverse device types, frequent changes, and a mix of managed and unmanaged devices. Everon™ Network Solutions's device management is specifically designed to handle these campus challenges.
Campus Device Management Overview🔗
Campus networks typically include:
- Access switches - In IDFs, conference rooms, classrooms
- Distribution switches - Building-level aggregation
- Core switches - Campus backbone connectivity
- Edge devices - Firewalls, wireless controllers, etc.
- Legacy devices - Existing switches that may be discovered but not managed
Everon™ Network Solutions handles all these device types, with automatic discovery for supported devices and inventory tracking for others.
Adding Campus Devices🔗

The campus device onboarding process:
- Create or select the provisioning object - Define the logical network location
- Create the device controller - Set up the management interface
- Assign a switchpoint - Map to logical topology position
- Prepare the physical switch - Basic connectivity and power
- Boot and connect - Automatic discovery and configuration
Campus Topology Creation🔗
For campus networks, start by creating your logical topology:
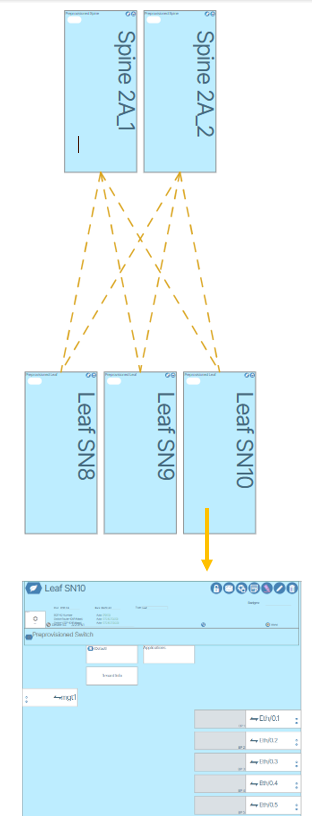
Adding Campus Access Switches🔗
- Enable the world view by clicking the World icon (
 )
) - Click the Topology (
 ) icon
 - Click the menu tab labeled Topology
- Click the Add Preprovisioned Switch (
 ) icon
 - Enter a meaningful name (e.g., "Building-A-Floor-2-IDF")
- Set the number of Expected Eth Ports based on your access switch model
- Set the Rack or location identifier
- Select Type as Leaf for access switches
- Assign to appropriate POD (building or floor grouping)
Adding Campus Distribution/Core🔗
- Use Type: Spine for distribution switches
- Use Type: Superspine for campus core switches
- Use Type: Management for out-of-band management switches
Campus-Specific Device Controller Setup🔗
Create a Campus Device Controller🔗
- From the world view, click Admin icon
- In the menu bar, click VNFs
- In the Device Controller tile, click the plus button (
 )
) - Type a descriptive name (e.g., "Building-A-Floor-2-Access-01")
- Click the Edit button (
 )
)
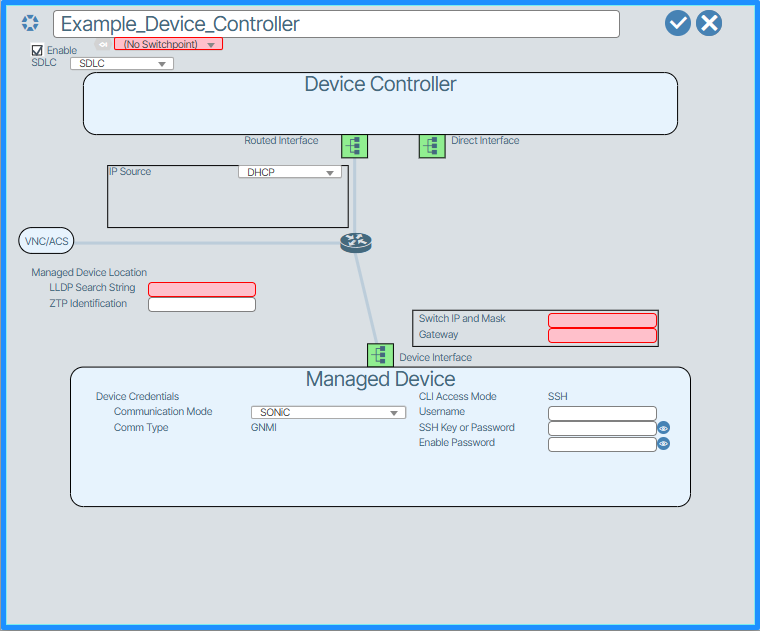
- Enter the LLDP Search String - This should be the switch serial number or chassis ID
- Configure management network settings: - Switch IP and Mask - From your campus management VLAN - Gateway - Your campus management gateway
Campus Management Network Considerations🔗
For campus deployments, the management network typically:
- Uses existing campus VLAN infrastructure
- Leverages campus DHCP services
- Connects through campus core switches
- May use in-band management for some devices
Campus Port Management🔗
Campus switches often require bulk port configuration due to similar access port requirements.
Manage Rows for Campus Access Ports🔗
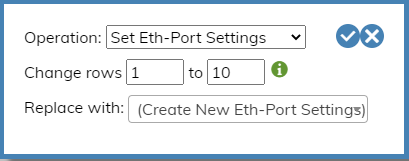
![]()
The Manage Rows button ( ) is particularly useful for campus environments:
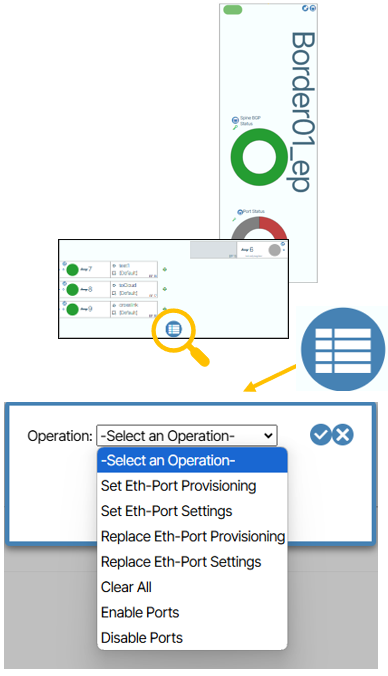
Campus Use Cases:🔗
Set Eth-Port Provisioning for Access Ports🔗
Apply the same access port profile to multiple ports (e.g., user access ports 1-24):
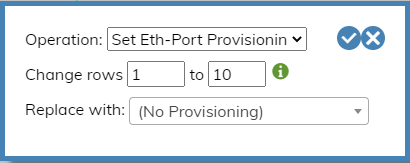
Set Eth-Port Settings for Campus VLANs🔗
Apply campus VLAN settings to port ranges:
Campus Port Types:🔗
- Access Ports - User devices, printers, phones
- Trunk Ports - Inter-switch links, wireless AP uplinks
- Management Ports - Out-of-band device management
Campus Device Discovery🔗
Automatic Discovery Process🔗
Everon™ Network Solutions automatically discovers campus devices through:
- LLDP Discovery - Identifies connected devices and topology
- DHCP Integration - Works with campus DHCP for IP assignment
- Management Protocols - SSH, SNMP, gNMI for device communication
- Topology Mapping - Builds real-time network map
Manual Device Addition🔗
For devices that don't auto-discover:
- Create the device controller with static IP information
- Configure LLDP search string manually
- Assign to appropriate switchpoint
- Verify connectivity through management network
Campus Device Types and Roles🔗
Managed Campus Devices🔗
- SONiC-based switches - Full management and configuration
- Vendor switches - Configuration through standard protocols
- Legacy switches - Limited management, inventory tracking
Discovered but Unmanaged🔗
- Servers and endpoints - Inventory and connectivity tracking
- Wireless controllers - Connection monitoring
- Legacy infrastructure - Visibility without management
Campus Device Operations🔗
Common Campus Tasks:🔗
Device Replacement🔗
- Take old device out of service
- Power down and disconnect
- Install new device with same management IP
- Everon™ Network Solutions automatically detects and configures
Port Moves/Adds/Changes🔗
- Connect device to different port
- Everon™ Network Solutions automatically updates topology
- Configuration follows the logical assignment
Building Additions🔗
- Create new POD for new building
- Add distribution switches as new Spines
- Add access switches as Leafs in new POD
- Configure inter-building connectivity
Campus Device Monitoring🔗
Everon™ Network Solutions provides campus-specific monitoring:
- Port utilization - Track user port usage patterns
- Device health - Monitor campus switch performance
- Connectivity changes - Alert on topology changes
- Capacity planning - Historical data for growth planning
Troubleshooting Campus Devices🔗
Common campus device issues:
Device Won't Discover🔗
- Verify management network connectivity
- Check LLDP configuration on device
- Confirm DHCP scope has available addresses
- Validate device controller LLDP search string
Configuration Not Applied🔗
- Check device controller to switchpoint assignment
- Verify management protocol connectivity (SSH/SNMP)
- Review device compatibility with configured features
Topology Not Accurate🔗
- Verify LLDP is enabled on all devices
- Check for cabling issues affecting discovery
- Review device naming and identification
Best Practices for Campus Device Management🔗
- Use descriptive naming - Include building, floor, room in device names
- Organize by PODs - Group devices logically (by building, department, etc.)
- Standardize port profiles - Create consistent access port configurations
- Plan IP addressing - Use structured management IP schemes
- Document exceptions - Track any devices requiring special configuration
Next Steps🔗
Once your campus devices are added:
- Campus Templates - Configure standardized campus services
- Campus Switch Pairs - Set up redundancy for critical access
- Campus Ethernet Configuration - Configure campus-specific port settings
- Campus Monitoring - Set up monitoring for your campus devices